The RaspberryPi is running the core of Windows 10. This means that everything, not needed for running one app at a time, is left out of Windows 10. And with one app I mean, one visual app.
Until now I have always build a Windows UWP app to run something on the RaspberryPi. And the fact it has a form which can represent visual elements in XAML, it gives away that it is a visual app. These kind of apps are running in headed mode.
But running one visual app, taking the whole screen occupied in headed mode, does not prevent the OS from running multiple background processes in headless mode.
Today we will build our first simple web server on the Raspberry Pi running Windows 10 IoT Core.
This is part 1 of a series of blogs about using headless apps:
- Part 1: Building a Windows 10 IoT Core background web server
- Part 2: Combining Windows 10 IoT Core headed and headless apps
We are using Visual Studio and we start with a new project template called Background Application (IoT):

Next, we replace the default startup task with this:
public sealed class StartupTask : IBackgroundTask
{
  private static BackgroundTaskDeferral _Deferral = null;

  public async void Run(IBackgroundTaskInstance taskInstance)
  {
    _Deferral = taskInstance.GetDeferral();

    var webserver = new MyWebserver();

    await ThreadPool.RunAsync(workItem =>
    {
      webserver.Start();
    });
  }
}
This code will start a web server to wait for a web request (missing web server code will be shown next). But there is a little catch. We have to get a ‘deferral’. This means that we prevent the app from being closed right after executing “webserver.Start();” (because that would be the last line of code in this app).
After taking care of that deferral, we add the web server itself:
internal class MyWebserver
{
  private const uint BufferSize = 8192;

  public async void Start()
  {
    var listener = new StreamSocketListener();

    await listener.BindServiceNameAsync("8081");

    listener.ConnectionReceived += async (sender, args) =>
    {
      var request = new StringBuilder();

      using (var input = args.Socket.InputStream)
      {
        var data = new byte[BufferSize];
        IBuffer buffer = data.AsBuffer();
        var dataRead = BufferSize;

        while (dataRead == BufferSize)
        {
          await input.ReadAsync(
               buffer, BufferSize, InputStreamOptions.Partial);
          request.Append(Encoding.UTF8.GetString(
                                        data, 0, data.Length));
          dataRead = buffer.Length;
        }
      }

      string query = GetQuery(request);

      using (var output = args.Socket.OutputStream)
      {
        using (var response = output.AsStreamForWrite())
        {
           var html = Encoding.UTF8.GetBytes(
           $"<html><head><title>Background Message</title></head><body>Hello from the background process!<br/>{query}</body></html>");
           using (var bodyStream = new MemoryStream(html))
           {
             var header = $"HTTP/1.1 200 OK\r\nContent-Length: {bodyStream.Length}\r\nConnection: close\r\n\r\n";
             var headerArray = Encoding.UTF8.GetBytes(header);
             await response.WriteAsync(headerArray,
                                       0, headerArray.Length);
             await bodyStream.CopyToAsync(response);
             await response.FlushAsync();
          }
        }
      }
    };
  }

  private static string GetQuery(StringBuilder request)
  {
    var requestLines = request.ToString().Split(' ');

    var url = requestLines.Length > 1
                      ? requestLines[1] : string.Empty;

    var uri = new Uri("http://localhost" + url);
    var query = uri.Query;
    return query;
  }
}
When this web server is started, it will wait for web requests at port 8081. Of course, port 8080 is already used by the internal ‘website’ to manage the RaspberryPi.
When a web request is received, three steps are executed:
- The request’s head and body are put in a StringBuilder for further examination
- The query string in the ‘fat URL’ is extracted
- A response is composed which shows the query string received.
The request will finally look like “http://%5Bip address]:8081/api/test?aaa=123”:
-
GET /api/test?aaa=123 HTTP/1.1
Accept: text/html, application/xhtml+xml, image/jxr, */*
Accept-Language: nl-NL,nl;q=0.8,en-US;q=0.5,en;q=0.3
User-Agent: Mozilla/5.0 (Windows NT 10.0; Win64; x64) AppleWebKit/537.36 (KHTML, like Gecko) Chrome/46.0.2486.0 Safari/537.36 Edge/14.14295
Accept-Encoding: gzip, deflate
Host: 192.168.1.114:8081
Connection: Keep-Alive
So the query will be “?aaa=123”.
Our final step is to add the capability to the app to run the webserver:
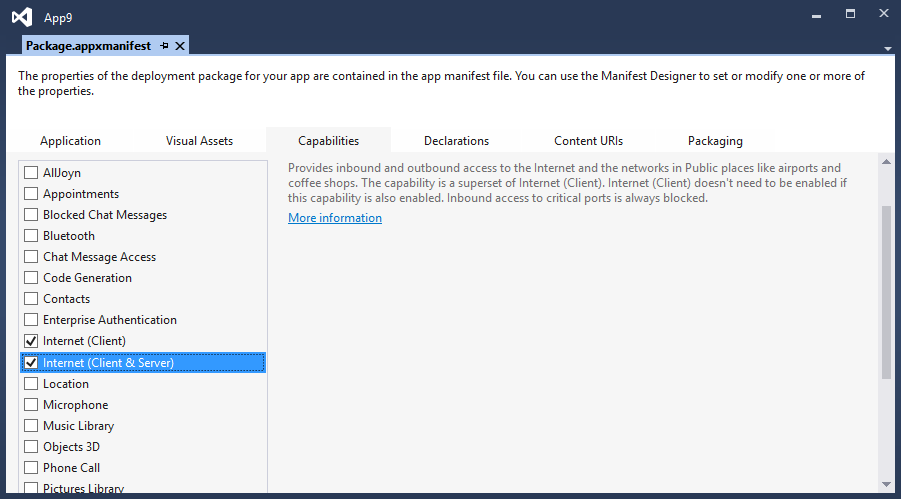
If you forget this step, you will get an error in the output window of Visual Studio:
- Exception thrown: ‘System.UnauthorizedAccessException’ in BackgroundApplication1.winmd
WinRT information: At least one of either InternetClientServer or PrivateNetworkClientServer capabilities is required to listen for or receive traffic
The program ‘[1988] backgroundTaskHost.exe’ has exited with code 0 (0x0).
So this capability gives use the power to listen to inbound traffic…
Start deploying the background process app to the RaspberryPi. Set the Solution target platform to ARM and enter the IP address of the Pi as remote machine:

Deploy the app and check that it keeps on running!
Note: if an HDMI monitor is attached to the RaspberryPi, no change is shown while the background process is running.
While running, go to your favorite browser and enter something like this to surf to your own web server:
And now an HTML page is returned, with the query string shown in the bottom line:

To keep the web server running, even after we close Visual Studio or we reboot the RaspberryPi, follow the instructions at the bottom of this page.
In short, the background process must be started at startup (Use the Windows Device Portal to change this):

This proves we can actually run a web server, written in C#, on a RaspberryPi, in the background.

When I want to set this server as startup app, I get an error without any description… Any tips to find a cause?
Does it work when you install and run it using Visaul Studio? Did you ad the capability?
Build something similar and created a nuget package for it called “restup” (hosted on github).
Good post. I’m using your webserver as starting point for an other project
Hi,
In the post you typed ?aaa=23 in the url, instead of this i want show sensor values here..is it posible ..?like Temperature=sensoroutput.
Yes, this is possible to pass any value using the ‘fat url’. First you just have to define/pass your own query parameters and next you have to parse the query as it arrives at the webserver. This example explains how to show data cominig from the query but you can access the GPIO pins too.
I will try that..Anyway thank you for sharing such a useful article.
Hello i implemented same code as yours and also added capabilities as mentioned, but application still stops after “webserver.Start();”
Any suggestions, what should I do ?
Are you sure the ‘deferral’ is added? Otherwise, the application closes gracefully because all code is executed (from the applications point of view 🙂 )