Arduino Nano - Bluetooth
This tutorial instructs you how to use Arduino Nano to control Bluetooth HC-05 Module. In detail, we will learn:
- The steps to use Bluetooth with Arduino Nano
- The process of sending data from Arduino Nano to a smartphone app over Bluetooth
- The way to receive data on Arduino Nano from the smartphone app via Bluetooth
- The technique to control Arduino Nano from the smartphone app through Bluetooth
The purpose of this tutorial:
- To demonstrate how Arduino Nano can exchange data with a smartphone app.
- To show how the HC-05 Bluetooth Module can be used.
- To explain how the Bluetooth Serial Monitor App on Android can be used.
- To illustrate how to control LED and servo motor from the smartphone app.
This tutorial focuses on Classic Bluetooth (Bluetooth 2.0). If you require information on Bluetooth Low Energy - BLE (Bluetooth 4.0), please refer to this similar tutorial: Arduino Nano - Bluetooth Low Energy
Hardware Preparation
| 1 | × | Arduino Nano | |
| 1 | × | USB A to Mini-B USB cable | |
| 1 | × | HC-05 Bluetooth Module | |
| 1 | × | Jumper Wires | |
| 1 | × | (Optional) 9V Power Adapter for Arduino Nano | |
| 1 | × | (Recommended) Screw Terminal Adapter for Arduino Nano |
Or you can buy the following sensor kits:
| 1 | × | DIYables Sensor Kit (30 sensors/displays) | |
| 1 | × | DIYables Sensor Kit (18 sensors/displays) |
Overview of HC-05 Bluetooth Module
HC-05 is a Serial Bluetooth module which functions as a Serial to Bluetooth Converter. It performs the following tasks:
- Receiving data from the Serial RX pin and transmitting it to the paired device (like a smartphone) over Bluetooth
- Obtaining data from Bluetooth (from the paired device) and sending it to the Serial TX pin.
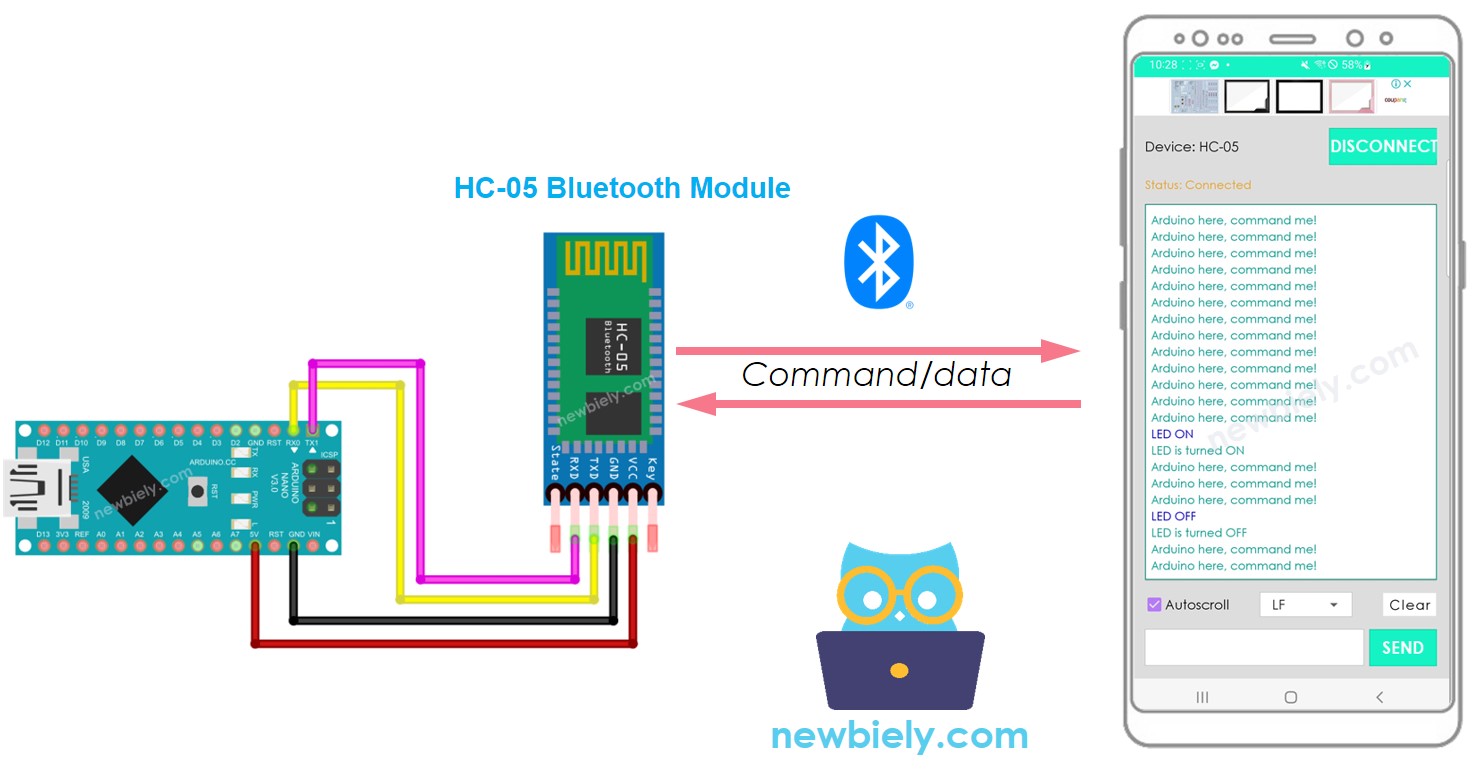
Specifically, in regards to Arduino Nano communicating with a smartphone App (Android/iOS):
- The Arduino Nano is connected to an HC-05 Bluetooth Module through Serial/SoftwareSerial pins.
- The HC-05 Bluetooth Module is linked to the smartphone App.
- Arduino Nano sends data to the smartphone App by sending it to Serial/SoftwareSerial.
- Arduino Nano receives data from the smartphone App by reading it from Serial/SoftwareSerial.
- No special Bluetooth code is needed on the Arduino Nano.
The Bluetooth HC-05 Module Pinout
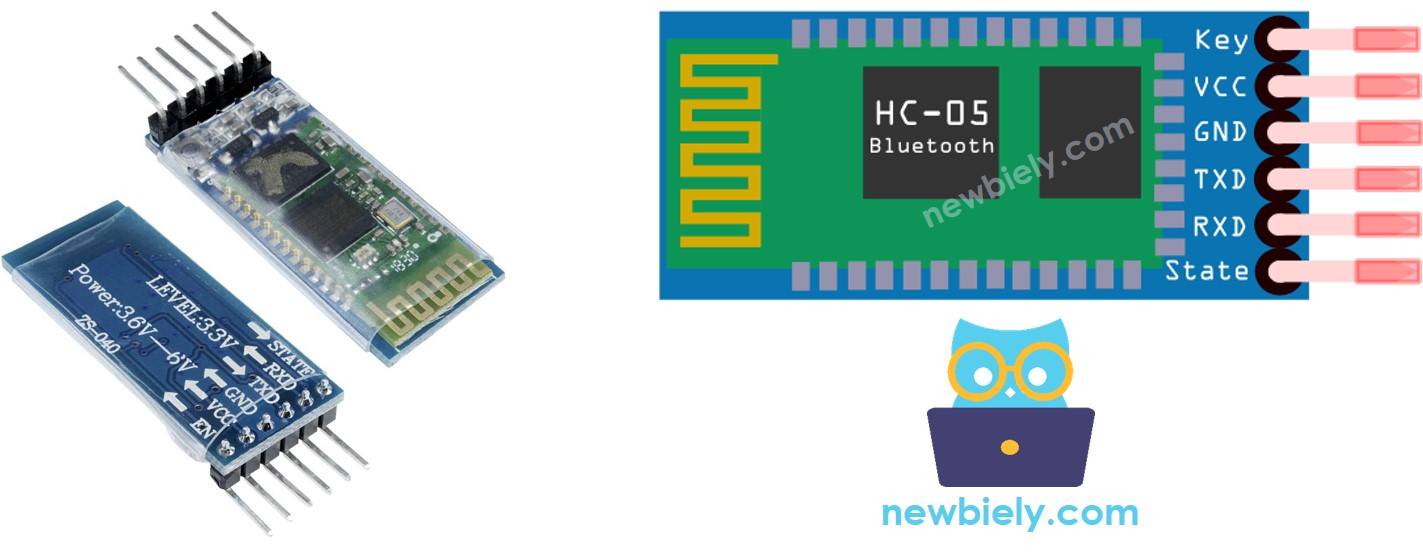
The HC-05 Bluetooth Module has 6 pins:
- Enable/Key pin: This pin is used to switch between Data Mode (set LOW) and Command mode (set HIGH). If it is not connected, it is in Data mode by default.
- VCC pin: power pin, this pin needs to be connected to +5V of Supply voltage.
- GND pin: power pin, this pin needs to be connected to the GND of the power source.
- TX pin: Serial data pin, this pin needs to be connected to the RX pin of Arduino Nano. The data received via Bluetooth will be sent to this pin as serial data.
- RX pin: Serial data pin, this pin needs to be connected to the TX pin of Arduino Nano. The data received from this pin will be sent to Bluetooth.
- State: The state pin is connected to the onboard LED, it can be used as feedback to check if Bluetooth is functioning correctly.
Nevertheless, to perform basic functions, only four pins of The HC-05 Bluetooth Module are necessary to be connected to Arduino Nano.
The HC-05 Bluetooth Module also has two built-in components:
- A LED which indicates the status of the Module:
- Blinking once every two seconds indicates that the Module has entered Command Mode
- Rapid blinking indicates that it is waiting for connection in Data Mode
- Blinking twice per second signifies a successful connection in Data Mode
- A Button which can be used to control the Key/Enable pin to select the operation mode (Data or Command Mode)
How It Works
The HC-05 Bluetooth module has two modes of operation:
- Data mode, which is used to transmit and receive data with the connected device
- Command Mode, which is used to configure settings.
Fortunately, the HC-05 Bluetooth module is capable of working with Arduino Nano without any configuration, using the default setting.
HC-05 Default Settings
| Default Bluetooth Name | “HC-05” |
|---|---|
| Default Password | 1234 or 0000 |
| Default Communication | Slave |
| Default Mode | Data Mode |
| Default Data Mode Baud Rate | 9600, 8, N, 1 |
| Default Command Mode Baud Rate | 38400, 8, N, 1 |
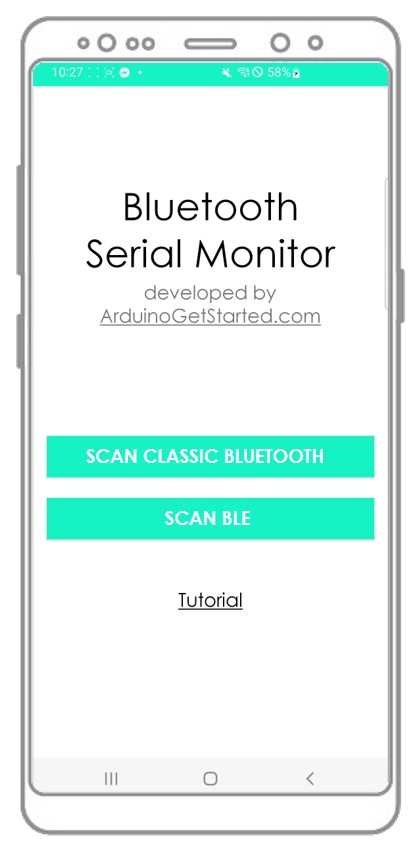
Overview of Bluetooth Serial Monitor App
The Bluetooth Serial Monitor App is a mobile application that has a User Interface similar to the Serial Monitor of the Arduino IDE. It communicates with an Arduino Nano device via Bluetooth. You can interact with the Arduino Nano as if it were connected to a PC's Serial Monitor, without needing to add any special code for the Bluetooth module in your Arduino Nano code. To do so, follow these steps:
- Connect the Arduino Nano to an HC-05 Bluetooth module
- Install the Bluetooth Serial Monitor App on your smartphone
- Open the App and pair it with the HC-05 Bluetooth module
Now, you can send and receive data from Arduino Nano in the same way as the Serial Monitor of Arduino IDE. No modifications to the existing Arduino Nano code or adding of Bluetooth code to the new Arduino Nano code is necessary.
Wiring Diagram
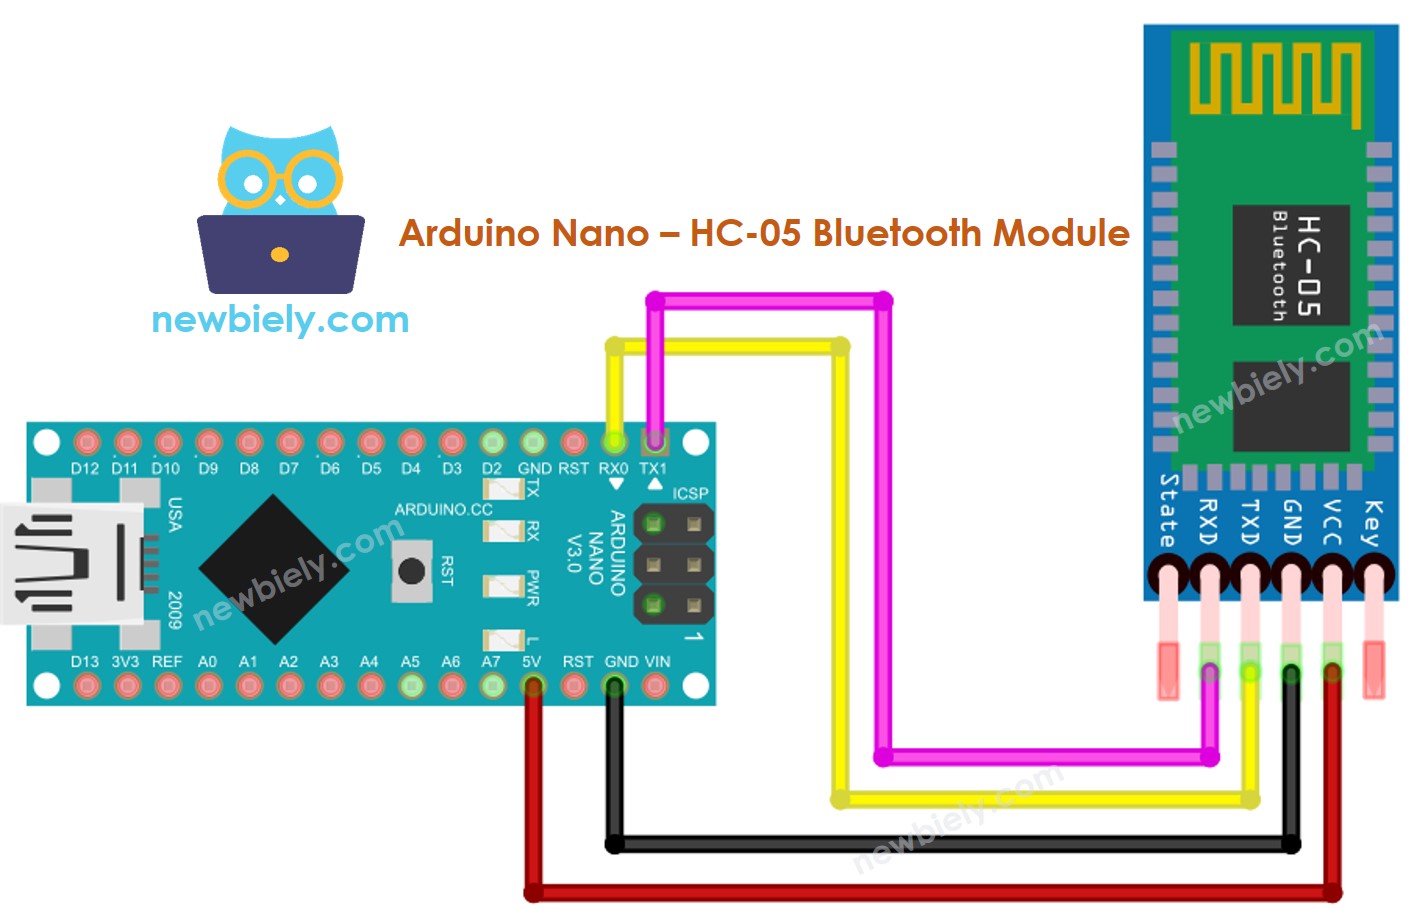
This image is created using Fritzing. Click to enlarge image
Table of Wiring. Wiring Chart. Chart of Wiring
| Arduino Nano Pins | HC-05 Bluetooth Pins |
|---|---|
| RX (Pin 0) | TX |
| TX (Pin 1) | RX |
| 5V | VCC |
| GND | GND |
| Enable/Key (NOT connected) | |
| State (NOT connected) |
※ NOTE THAT:
You can utilize other Arduino Nano pins by altering the Serial object in the Arduino Nano code to another Serial1, Serial2,..., or SoftwareSerial if accessible.
How To Program For Bluetooth
No code specifically for Bluetooth is necessary. We only need to utilize the Serial code.
Arduino Nano sends data to Bluetooth App on Smartphone
In order to transmit data from an Arduino Nano to a Bluetooth App on a Smartphone, the following code must be used with the Arduino:
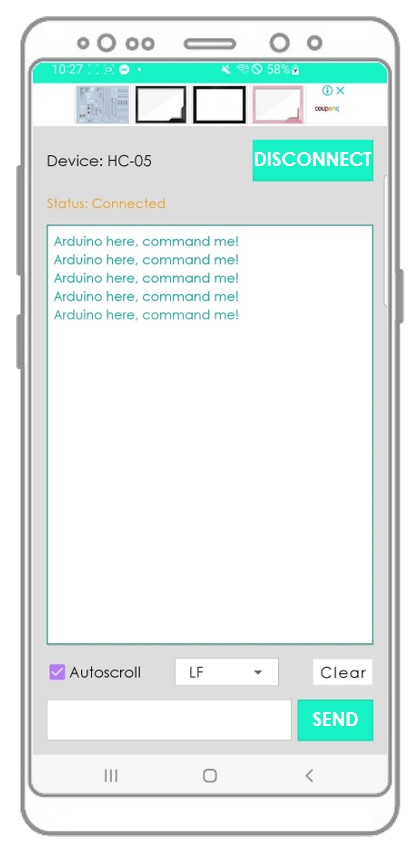
In this example, we will have Arduino Nano send “Arduino here, command me!” to the Bluetooth App on a Smartphone every second.
Detailed Instructions
- Download and install the Bluetooth Serial Monitor App to your smartphone.
- Wire the HC-05 Bluetooth module to the Arduino Nano as per the wiring diagram.
- Open the Arduino IDE, copy the code and paste it into the IDE.
- Click the Upload button on the Arduino IDE to upload the code to the Arduino Nano. If unsuccessful, disconnect the TX and RX pins from the Bluetooth module, upload the code, and then reconnect the RX/TX pin again.
- Open the Serial Monitor on the Arduino IDE.
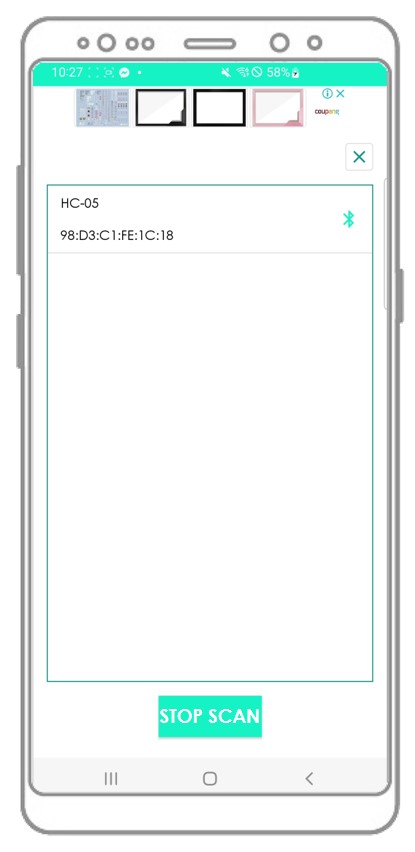
- Open the Bluetooth Serial Monitor App on your smartphone and select the Classic Bluetooth mode.
- Connect the HC-05 Bluetooth module to it.
- Check out the outcome on the Android App.
- View the outcome in the Serial Monitor of the Arduino Nano Integrated Development Environment.
You will observe that the information displayed on the Serial Monitor of the Arduino IDE and the Android App are the same.
Bluetooth App Send data To Arduino Nano
The following code:
- Transmits data from a Bluetooth app to an Arduino Nano
- Enables the Arduino Nano to read the data and return a response to the Bluetooth app
Detailed Instructions
- Copy the code and open it in Arduino IDE.
- Click the Upload button on Arduino IDE to compile and upload the code to Arduino Nano.
- Open the Serial Monitor on Arduino IDE.
- Start the Android App and pair it with the HC-05 Bluetooth module as done previously.
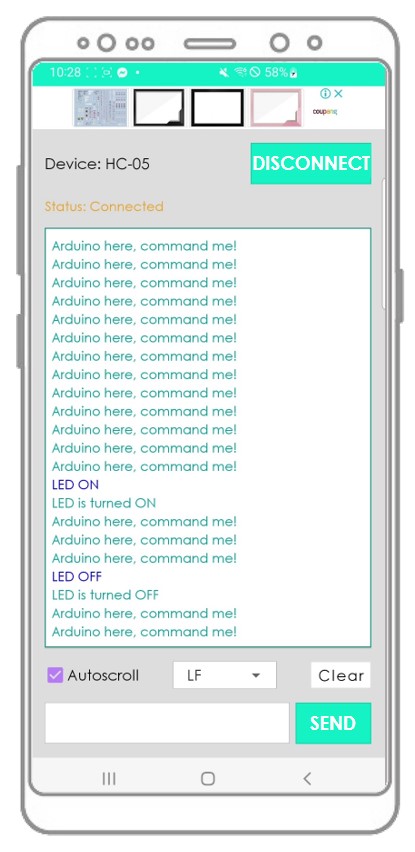
- Once connected, type either "LED ON" or "LED OFF" on the Android App and press the "SEND" button.
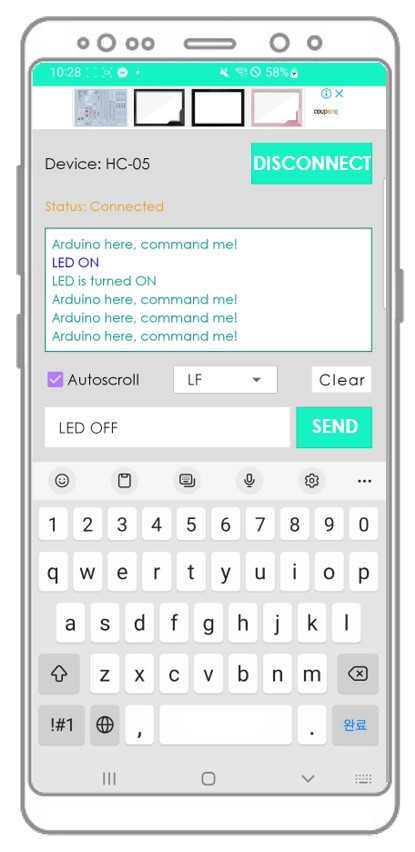
- Arduino Nano receives the data and prints the response to the Serial port.
- The data is then sent to the Bluetooth app.
- The result can be viewed on the Android App.
- View the output in the Serial Monitor of the Arduino IDE.
You will observe that the information displayed on the Serial Monitor of the Arduino IDE and the Android App are the same.
Arduino Nano Code - Control LED with smartphone App via Bluetooth
The following Arduino Nano example code is designed to accept two commands (“ON” and “OFF”) from a Bluetooth Serial Monitor App. These commands are used to switch on/off an in-built LED.
You can view a more detailed description of the instructions in the Arduino Nano controls LED via Bluetooth/BLE tutorial.
Arduino Nano Code - Control Servo Motor with smartphone App via Bluetooth
The Arduino Nano code below . * receives the angle value . * from the Bluetooth Serial Monitor App . * to control the angle of the servo motor.
You can view the instructions in greater detail in the Arduino Nano controls Servo Motor via Bluetooth/BLE tutorial. You can get a more thorough look at the instructions in the Arduino Nano controls Servo Motor via Bluetooth/BLE tutorial. For a comprehensive look at the instructions, please refer to the Arduino Nano controls Servo Motor via Bluetooth/BLE tutorial
If you find the Bluetooth Serial Monitor app helpful, please show your appreciation by giving it a 5-star rating on Play Store. Your support is much appreciated!