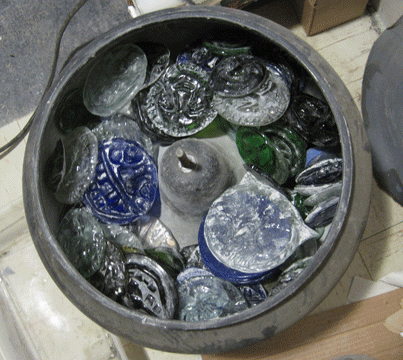
One of the facts of life about working in glass is cold working. It’s not a lot of fun for very long. Don’t get me wrong, I enjoy watching glass become all smooth and clear and gorgeous through all of the stages. I just don’t love it 90 times in one day.
This is a huge batch of small recycled glass sunspots for wholesale. The smaller pieces are about 3.5″ across. You can see how cold working all of these little tiny things one at a time is simply not feasible. In addition, the faces are 3 dimensional, which means the top surface will have to be polished using a felt disc with polishing compound and a dremel tool, or flex shaft. Here’s an example of a face with heavy devitrification, and a good amount of firmly attached kiln wash.
For a high volume wholesale item, hand polishing is just not going to work. That’s where my lovely vibrating rock polisher comes in. (photo above)
Vibrating rock polishers are a speedy way to quickly and uniformly polish a bunch of things at once. Here’s a quick rundown on how to do it, then we’ll address things you should know when shopping for a rock polisher.
1. Load the artwork in the polisher:
2. Add abrasive grit and small glass mix:
The abrasive grit is the same type used for rock polishing. Before loading I cut off the burs and smoothed the edges of these pieces using my tile saw. Now I’d like to uniformly polish them so the saw marks are gone and any devitrification on the surface is also polished away.
Because the polishing is a process of abrasion, if I just put in my artwork, there will be a lot of large flat surfaces polishing the other large flat surfaces flat. Adding small glass chunks to the mix allows the small pieces to rub abrasive into the details of my artwork. The finer the detail, the smaller your glass mix should be. Broken 1/4″ tempered glass chunks are an excellent carrier for slurry and can be washed clean and used again and again for high detail work.
You don’t need a ton of grit. For a 45 lb tumbler, I use approximately 3 Tablespoons of 120/220 mix grit.
3. Start the tumbler:
The vibrating polisher works by shaking the contents of the tumbler in a vortex pattern, rather than rolling it like a more traditional rock tumbler. The vortex action speeds up the polishing dramatically. The polisher is quite loud, so I have deleted the sound from the video. After a minute or so of polishing, pull a piece of glass from the polisher and rub it, if you can feel a fine coating of abrasive, then you have enough grit. It won’t necessarily be visible. Too much grit will gum up at the bottom of the polisher and cause problems later.
4. Monitor progress and be realistic:
It’s a really good idea to periodically monitor progress of your polish. And by periodically, I mean every 20 minutes or so. If I forget, I’ll end up with a whole bunch of discs with the faces polished off. This batch ended up running for 1 hr 20 minutes.
Be realistic about what you’ll end up with. Here is the same blue face that we looked at above:
 You can see there is still some devitrification in the deep areas of the face. I could keep polishing until those disappear, but I risk losing the detail around the eye, so I’ll grind those area’s out with a diamond dremel bit before I fire polish.
Because the polisher is working with gravity and abrasives, you should be cautious using this method for delicate items. Those glass pieces are rolling around in there at a pretty good clip, and breakage is possible:
 Here’s a moon face with a chip in the edge.
Now, things to remember when buying a vibrating rock tumbler:
- You get what you pay for. Make sure you buy a tumbler that has a solid rubber barrel. The cheaper plastic barrels don’t hold up and cause more breakage because the glass isn’t cushioned as it vibrates in the vortex against the sides of the tumbler.
- Consider what your end goal is. If you are making one of a kind, delicate pieces, this is probably not the cold working method for you. If you are producing massive quantities of small items that can be batch processed, this may be a life-saver for you.
- Buy the right size. Tumblers come in multiple sizes. The large one pictured at the top of this post holds 40+ lbs of rock or glass. I also have a smaller one that holds about 2 cups that is very handy for jewelry pieces or small batches of things.
Now, the big question: Is it worth it? Well, here’s all of the recycled glass artwork pieces that I tumbled for less than an hour and a half today. I still had to do some handwork on some (less than 10) of them and lost one to breakage. This entire batch is being fire polished now, and will be ready to drill tomorrow. I think it’s worth my time.
Related Articles:
Coldworking and Fire Polishing
- Please pin and share!


